For some time I’ve been hearing about Helm and have been asked by people how they could deploy into OpenShift applications defined as Charts, the format Helm uses to package an application.
One of the really nice features that minishift >= 1.2.0 introduced was the concept of an addon which is a way to provide additional capabilities to your minishift local environment. As this feature is really interesting, and evolving really nicely, I have developed some addons that allow me to extend my minishift capabilities by issuing a single command.
In this blog I will describe how to deploy helm into minishift OpenShift, and then I will deploy a sample application using a helm chart.
Note that this is not supported and it is used for the solely purpose of supporting and describing the work that has been done around minishift addons. If you want to use what here is described, it’s at your own risk.
Helm in a Handbasket
I have taken this part from the helm documentation, as it perfectly introduces helm in a few sentences:

Install
You will definitely need to install helm on your laptop, as it consists of two parts, a client(helm) and a server(tiller). To find the latest client go here and find the binary that suits your Operating System.
Unpack the helm binary and add it to your PATH and you are good to go!
The server part, tiller, will be installed in minishift via an addon.
Start minishift (Use virtualbox)
There is already a guide on how to install minishift, so I will expect that you have followed it and that you have minishift already working.
I will also expect that you’re using the latest minishift version available today (1.3.0) or a newer one, if there is one already available as you read this.
Presuming that you read this blog as soon as it is published, and that you don’t have a minishift instance already up and running, this is the process you would follow to be able to continue with the blog.
First, I will install the default addons that come shipped with minishift, and then I will enable an addon that will create an admin user, so I can easily log into the minishift OpenShift web UI as admin of the platform.
|
|
This process instructs every minishift instance that will be created from this point to install this addon, so it’s a one time step.
Now, I will create my minishift instance. I’m using the latest available openshift version as the time of writing, but you could just be using the default shipped with minishift. Also, I’m using virtualbox as virtualization technology, but you could again be using the one you prefer from all the available technologies for your Operating System. And also, I like to give the VM enough cpu and memory so that I can comfortably work.
$ minishift start --vm-driver=virtualbox --openshift-version=v3.6.0-rc.0 --cpus=2 --memory=8192
Starting local OpenShift cluster using 'virtualbox' hypervisor...
Downloading ISO 'https://github.com/minishift/minishift-b2d-iso/releases/download/v1.0.2/minishift-b2d.iso'
 40.00 MiB / 40.00 MiB [===================================================================================================================================================================================================] 100.00% 0s
Downloading OpenShift binary 'oc' version 'v3.6.0-rc.0'
 33.74 MiB / 33.74 MiB [===================================================================================================================================================================================================] 100.00% 0s
Starting OpenShift using openshift/origin:v3.6.0-rc.0 ...
Pulling image openshift/origin:v3.6.0-rc.0
Pulled 1/4 layers, 26% complete
Pulled 2/4 layers, 64% complete
Pulled 3/4 layers, 77% complete
Pulled 4/4 layers, 100% complete
Extracting
Image pull complete
OpenShift server started.

The server is accessible via web console at:
    https://192.168.99.100:8443

You are logged in as:
    User:     developer
    Password: [any value]

To login as administrator:
    oc login -u system:admin

-- Applying addon 'admin-user':..
Install helm addon (tiller - server side)
Now that we have minishift up and running, we can install helm’s server part, tiller. For this, I have created an addon that simplifies the installation.
The process is as simple as install my addon and the apply the addon, so that helm tiller will be provisioned one time on this machine. Note that I use apply instead of enable, as I just want this install to happen for the current minishift instance and not every time I create a new minishift instance.
$ cd /tmp
$ git clone https://github.com/jorgemoralespou/minishift-addons
$ cd minishift-addons
$ minishift addons install helm
$ minishift addons apply helm
-- Applying addon 'helm':......
Get Tiller host URL by runninr these commands in the shell:
  export TILLER_HOST="192.168.99.100:$(oc get svc/tiller -o jsonpath='{.spec.ports[0].nodePort}' -n kube-system --as=system:admin)"

Initialize the helm client, if not done already

e.g.
  helm init -c

Search for an application:

e.g.
  helm search

And now deploy an application

e.g.
  helm --host $TILLER_HOST --kube-context default/192-168-99-100:8443/system:admin
Now that we have installed tiller, we can log into the minishift OpenShift web UI as admin. Remember we have enabled the admin-user addon, so that there is an admin user with admin password to log in the web UI.
This will open the web UI in our browser.
minishift console
And once we log in with the admin credentials:

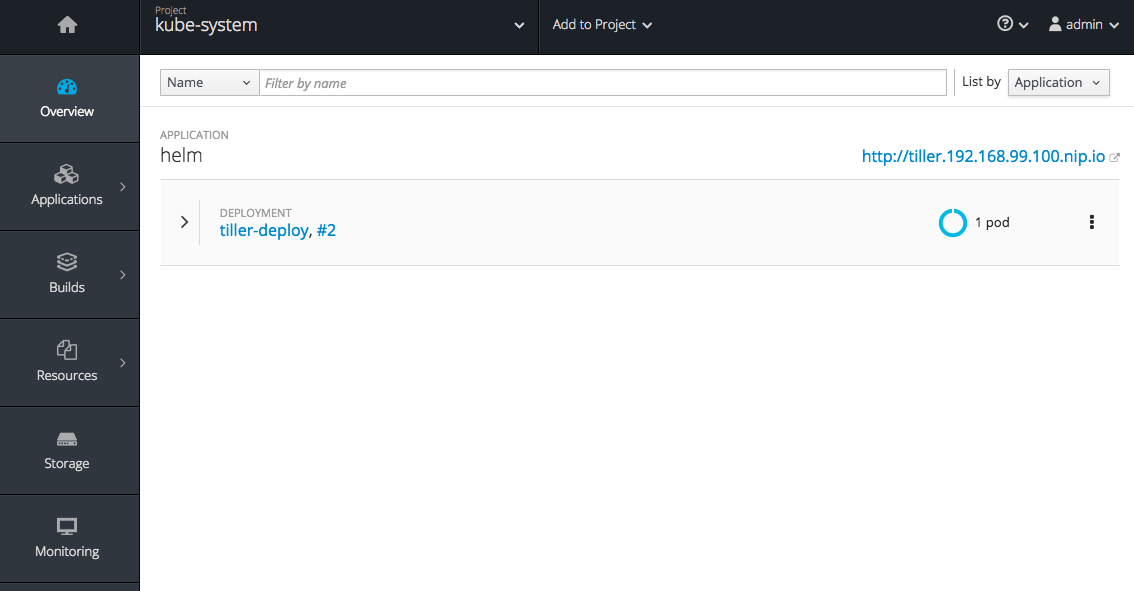
We will be able to see tiller deployed in the kube-system namespace.

As you would probably have noticed, it’s the “#2” deployment. This is mostly because the original helm deployment has been altered to use a dedicated serviceaccount helm, that will be given the required permissions cluster-admin. As I like to do, I tried to minimize who will get this escalated permissions to just the serviceaccount tiller will use.
NOTE: Helm currently has a shortcoming when it comes to work nicely in multitenant environments. Tiller requires cluster-admin role to properly work, and it’s not possible to install in an unprivileged manner in your own project/namespace to provide you with the ability to deploy applications there.This is in order to make the deployment as secure as possible.
Also, tiller is exposed through a routenodePort that we will use later. We create an environment variable to refer to tiller.
$ export TILLER_HOST="$(minishift ip):$(oc get svc/tiller -o jsonpath='{.spec.ports[0].nodePort}' -n kube-system --as=system:admin)"

$ echo $TILLER_HOST
192.168.99.100:30609
Install helm (client side)
It is time to configure our client helm to use tiller in minishift. I presume you have already installed the helm binary and added to the path, so you can use helm client.
To verify it:
$ helm version
Client: &version.Version{SemVer:"v2.5.0", GitCommit:"012cb0ac1a1b2f888144ef5a67b8dab6c2d45be6", GitTreeState:"clean"}
Error: cannot connect to Tiller
Obviously it can not connect to tiller. So let’s configure our helm client instance:
$ helm init -c
Creating /Users/jmorales/.helm
Creating /Users/jmorales/.helm/repository
Creating /Users/jmorales/.helm/repository/cache
Creating /Users/jmorales/.helm/repository/local
Creating /Users/jmorales/.helm/plugins
Creating /Users/jmorales/.helm/starters
Creating /Users/jmorales/.helm/cache/archive
Creating /Users/jmorales/.helm/repository/repositories.yaml
$HELM_HOME has been configured at /Users/jmorales/.helm.
Not installing tiller due to 'client-only' flag having been set
Happy Helming!
Now, there is a few caveats we need to take into account:
- helm does use HELM_HOST environment variable, or you need to use –host flag on every command.
- helm requires to use a kube context with admin provileges. sudoer accounts are not an option. There is no ENV to specify this, so it will use the current-context defined in $KUBECONFIG by default unless other is specified on the command line.
In minishift, the context for the admin user account by default is named “default/192-168-99-100:8443/system:admin". Note that the ip might depend on your install.
Deploy a sample application
Now it’s time to deploy any application, as this has really been the goal of what we’ve done so far.
I will use chronograf as sample application (reasons at the end of the blog), and I will create an OpenShift project for it.
$ oc new-project chronograf
$ helm install stable/chronograf --host $TILLER_HOST --kube-context default/192-168-99-100:8443/system:admin -n chronograf --namespace chronograf
NAME:   chronograf
LAST DEPLOYED: Wed Jul 19 14:29:17 2017
NAMESPACE: chronograf
STATUS: DEPLOYED

RESOURCES:
==> v1/Service
NAME                   CLUSTER-IP      EXTERNAL-IP  PORT(S)  AGE
chronograf-chronograf  172.30.177.119  none       80/TCP   1s

==> v1beta1/Deployment
NAME                   DESIRED  CURRENT  UP-TO-DATE  AVAILABLE  AGE
chronograf-chronograf  1        1        1           0          1s


NOTES:
Chronograf can be accessed via port 80 on the following DNS name from within your cluster:

- http://chronograf-chronograf.chronograf

You can easily connect to the remote instance from your browser. Forward the webserver port to localhost:8888

- kubectl port-forward --namespace chronograf $(kubectl get pods --namespace chronograf -l app=chronograf-chronograf -o jsonpath='{ .items[0].metadata.name }') 8888

You can also connect to the container running Chronograf. To open a shell session in the pod run the following:

- kubectl exec -i -t --namespace chronograf $(kubectl get pods --namespace chronograf -l app=chronograf-chronograf -o jsonpath='{.items[0].metadata.name}') /bin/sh

To trail the logs for the Chronograf pod run the following:

- kubectl logs -f --namespace chronograf $(kubectl get pods --namespace chronograf -l app=chronograf-chronograf -o jsonpath='{ .items[0].metadata.name }')
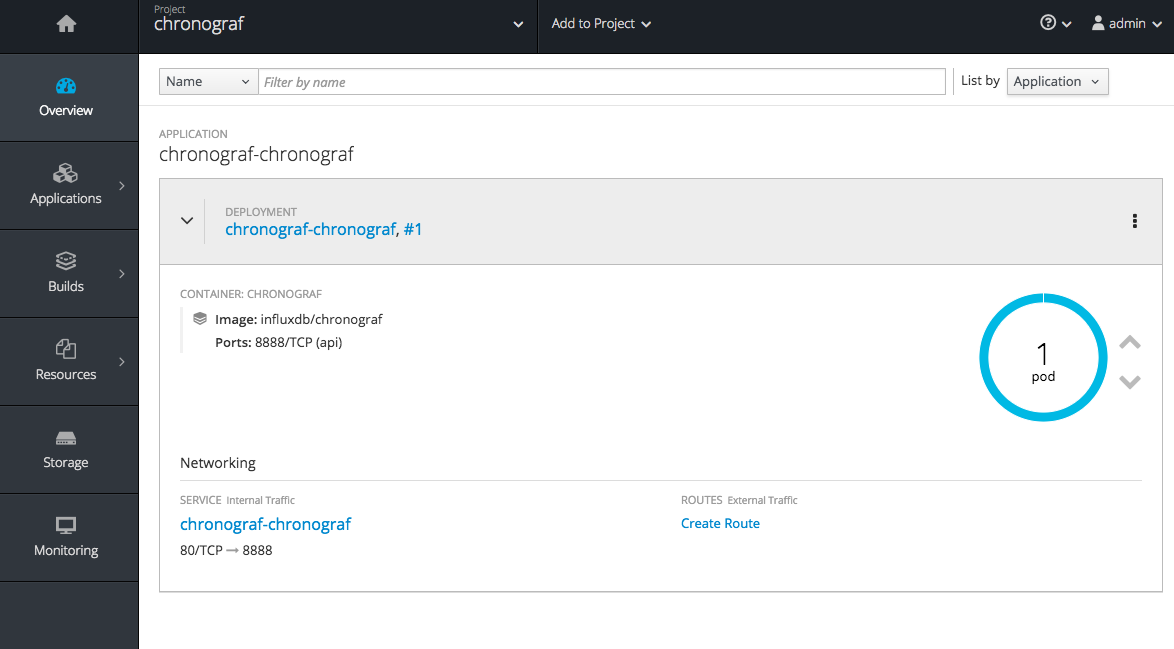
And you can see it deployed though minishift OpenShift web UI.

For convenience, you can wrap the helm command line in a script that will abstract you away the –host and –kube-context parameters. But this exercise is left out to you.
Summary
In this blog I have shown you how you can have helm up and running and deploy applications packaged as charts. As I wrote before, I used chronograf as sample application mainly because many of the applications that are packaged as helm charts and shipped in their repositories adole from security considerations. Many of the applications require to run privileged, or with a specific user id. Some others use kubernetes alpha annotations not supported on the latest OpenShift version I was using, and should change to the beta annotation supported (e.g the mysql pvc, where if you don’t implicitly specify a storageClass, it uses the alpha version of the annotation).
There is a wide range of applications packaged as helm charts and available in the interwebs to use, so now you can easily take advantage of them.
As a developer you have just got access to more technology to use. But remember, not always the more is the better.